Happy Victoria Day: Victoria Sponge

In honour of Victoria Day, here's my not-so-classic take on a Victoria Sponge.

A Victoria Sponge also known as a Victoria Sandwich is a typical British teatime treat made with strawberry jam and butter icing, sandwiched between two layers of sponge cake. It was said to be a favourite of Queen Victoria's, and popular during her reign, hence the name.

Marmalade Victoria Sponge. Photography and Styling by Helena McMurdo, My Endless Picnic.

Instead of strawberry jam, I went with marmalade. I am a marmalade addict and lately my favourite comes from Le Meadows Pantry.  Her Grapefruit and Sea Salt Marmalade is absolutely divine.

Marmalade Victoria Sponge. Photography and Styling by Helena McMurdo, My Endless Picnic.


Marmalade Victoria Sponge

For the cake:

150 g butter

3 eggs

150 g flour

2 teaspoons baking powder

1 tsp salt


For the  filling:

60 g butter, soft

125 g icing sugar

3 teaspoons warm water

1/4 teaspoon vanilla extract

4-6 tablespoons of your favourite marmalade

Preheat the oven to 350 Degrees and baseline a 7 inch cake tin with parchment paper.

Sift or whisk together the flour, baking powder and salt and set aside. Cream the butter and eggs together until fluffy and then add the dry ingredients a little at a time. When mixed through, pour into the cake tin.

Bake for 45-50 minutes, or until a skewer inserted into the cake comes out clean. Remove from the oven and allow to cool on a wire rack. In the meantime, make the filling

Put butter, sugar, water and vanilla in a bowl. Beginning slowly at first and gradually increasing speed, beat with an electric stand or hand held mixer until the mixture is very light.

Slice the cooled cake through the middle so you have two layers. Spread the butter icing on to the cut side of the bottom half of cake and spread the jam on the cut side of the top half. Sandwich the two halves together and then dust with icing sugar.

Pour yourself your favourite blend of tea and enjoy like a Queen.


Cherry Clafoutis

During the height of summer, with Vancouver under an Air Quality Warning due to surrounding Forest Fires, and experiencing temperatures upwards of 30 Degrees C for some reason, all I was thinking about was baking. 

It had to do with these beauties that I saw at the Farmer's Market early in the season. For some reason, raw cherries and I have never been friends. Even well washed organic ones make my lips and mouth itch. It's not like I haven't tried, but I know when to stop.  Cooked cherries are another story - bring them on. We get on like a house on fire.

BC Cherries are perfect for Cherry Clafoutis. Photography by Helena McMurdo. Recipe on myendlesspicnic.com

A few weeks ago, a particularly clever friend of mine brought a delightful dessert to another friend's bridal shower: A Cherry Clafoutis. Delicious, of course. I have always wanted to make one and ever since then, the idea has been planted in my brain.

Pour the custard over the cherries to make a Cherry Clafoutis.  Photography by Helena McMurdo. Recipe on myendlesspicnic.com
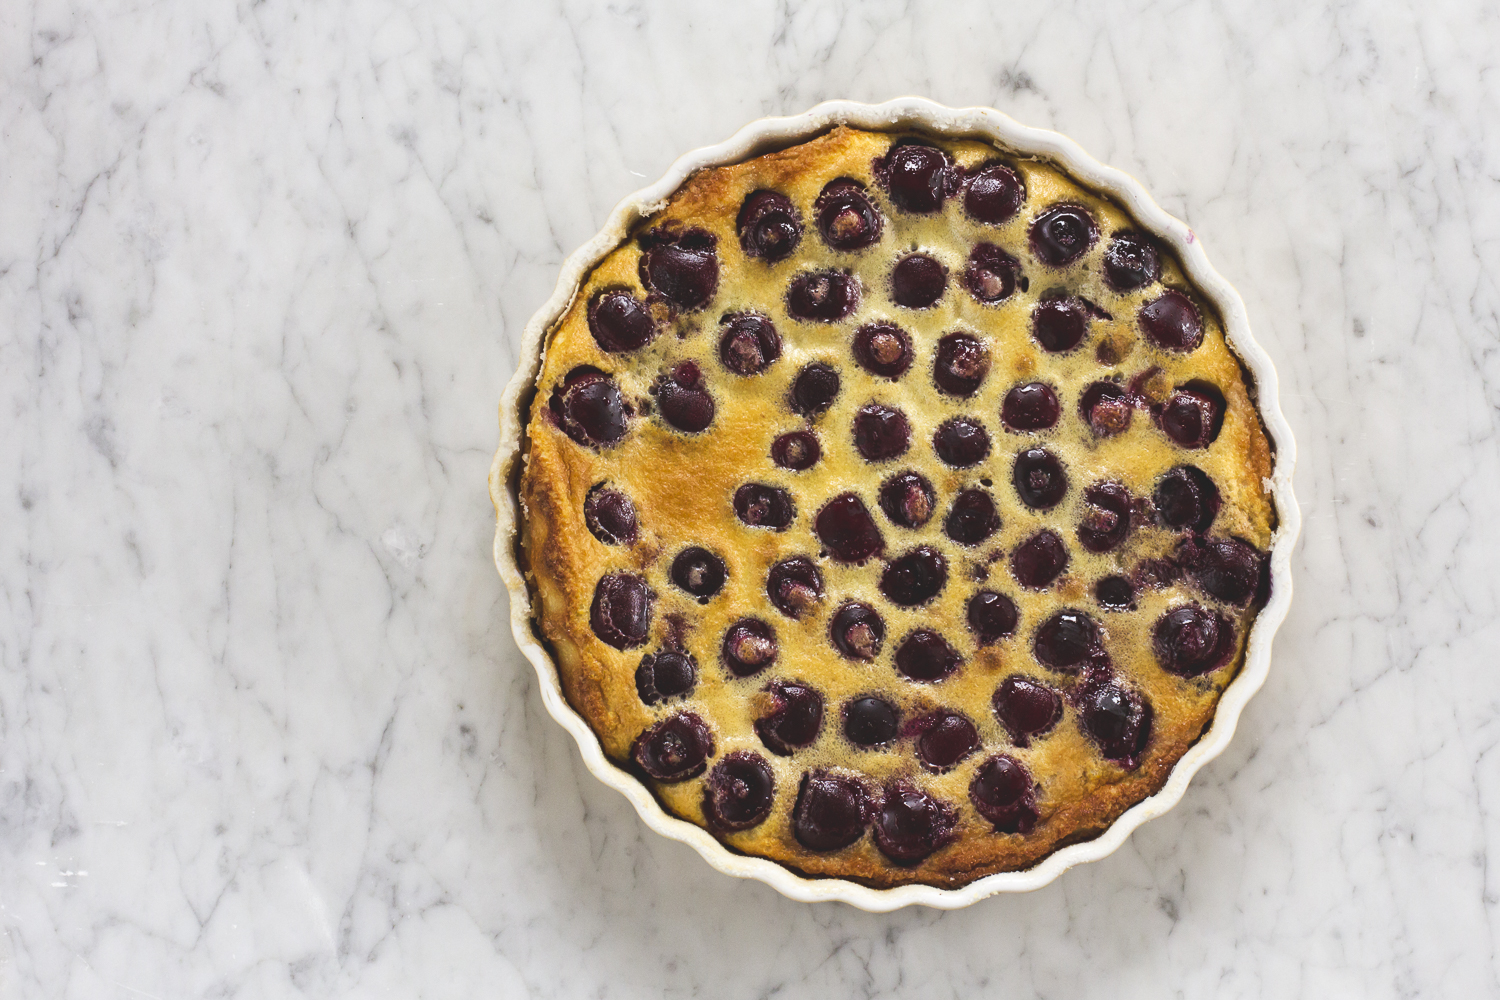
Bake the cherry Clafoutis until it is golden. Photography by Helena McMurdo. Recipe on myendlesspicnic.com

Several attempts were made, some successful, others not. By my third try, I had enlisted the help of my three-year-old nephew and I think we cracked it. I thought give him the simple job of removing the stems of the cherries, but once he saw me with the cherry pitter in hand, there was no way that he was not having a part of that action. He performed admirably and remarkably, we and my mother's kitchen, emerged unscathed.

Soaking the cherries releases the juices. Photography by Helena McMurdo. Recipe on myendlesspicnic.com

It's wonderfully simple to make. In fact, a three-year-old can do it. The pitting of the cherries is the most time consuming element, but other than that, you are simply mixing up a custard with a consistency similar to pancake batter in the blender and pouring it over the fruit. And if you bake regularly, you'll have most ingredients on hand.

The cherry season started early this year and is finishing up now. As we move into the late summer, you can easily substitute plums. Just slice them in quarters and arrange them beautfully in the baking dish and follow all other steps in the same manner.

Allow the clafoutis to cool completely. Photography by Helena McMurdo. Recipe on myendlesspicnic.com

And of course, you must dust with powdered sugar. And then dust some more.

Cherry Clafoutis

I've based my recipe on this one from Simply Recipes with a few amendments. I found that soaking the cherries in brandy, (surprise, surprise) gave a great added flavour to the fruit. With this addition, I reduced the amount of almond extract slightly. I also increased the temperature to 375 which I felt worked better for the custard. My special tip is to dust the greased baking dish with sugar instead of flour which gives a lovely browned crust.  

about 2 cups of fresh sweet cherries, pitted
2 TBSP brandy
2 TBSP blanched slivered almonds
3 eggs
3/4 cup  sugar
1 TBSP brown sugar
1/2 cup of all-purpose flour
1/8 teaspoon of salt
1 cup of milk (2% is fine)
1/2 teaspoon of almond extract
1 1/2 teaspoons of vanilla extract
Powdered sugar for dusting
extra granulated sugar for preparing the baking dish

1. Grease an 8-10 inch ceramic pie dish, dust it with granulated sugar and pop it in the freezer while you prepare the fruit and custard.

2. Pit the cherries using a cherry pitter. Don't be a hero and try to do it without. Invest in this fabulous piece of equipment (which you can also use for olives).

3. Optional step - place the cherries in a bowl and pour over the brandy. Let soak for 1/2 hour at least, preferably more.

4. Make the custard by placing the sugars, flour, salt, milk and extracts in a blender and mixing thoroughly.

5. Remove the pie dish from the freezer and arrange the slivered almonds to cover the bottom of the dish evenly. (I originally ommitted this ingredient but in subsequent trials,  found the almonds to be essential.)

6. Arrange the cherries and any juice in the dish on top of the almonds.

7. Pour the custard mixture over the cherries and place in preheated oven.

8. Bake for 30 minutes or until the centre is just ever so slightly wobbly and the top is golden.

9. Allow to cool completely and then prior to serving, dust with powdered sugar.

10. If you can't finish it for dessert, eat the rest for breakfast.


Colonial Seed Cake

Sometimes you stumble upon buried treasure.

An old friend was in town recently. I've known her for more than 40 years. Our fathers worked together and her family lived in Spain when we did and then our families both lived near each other in the North of Canada. She was at my parent's wedding when she was just 4 years old. We grew up together. Now adults, we don't live in the same city or even the same country but we've managed to stay in touch over the years. Sometimes the bond of shared history is one of the strongest. 

So when we met recently,with our extended families over dim-sum, there was lots of reminiscing. And lots of those memories involved food. My friend's mother was always hosting us for tea or organizing gourmet picnics in the snow, and I remember many a happy hour spent at her house with tea and biscuits and delicious things of all kinds. Sadly her mum passed on far too young. She was a lovely lady and taught me a lot about food and flowers and enjoying life for the simple things. She taught us to make antipasto with a recipe that we still use today.  I remembered that we had some of her recipes in among my mum's recipe collection.

I went looking for a few of them and came across this one that I hadn't remembered. The name intrigued me: Colonial Seed Cake. It seemed such a thing of the past. I had visions of ladies in India making this cake in the 1800s. It is in fact a poppy seed cake and tastes just as good today. It was lovely to find the hand-written recipe. Today we share our recipes on twitter, on blogs on instagram,  but it's not as if we invented it. Sharing was going on on long before - the old-fashioned way. The yellowed and stained paper is a testament to that.

The method is simple and not quite usual for most cakes I've made. The poppy seeds are steeped in milk for 3-4 hours, presumably for both flavour and a softening effect. There's no creaming together of sugar and butter first. The ingredients are simply mixed together all at once. Would it make a difference to do it the other way? Probably. But I have no complaints about the results of this method. It is perfectly scrumptious.

150327_152732_5484.jpg


I haven't edited the recipe at all, except to add the bracketed metric measurements.

I know we have loved it for the sense of rediscovery as well as the memories of the lady who made it but the taste is pretty good too. I hope you enjoy it.

Colonial Seed Cake

1/2 cup (2 oz)* poppy seeds

3/4 cup (180 ml) milk

3/4 cup (180 g) butter

3 eggs

1 1/4 cups (250 g) sugar

1 tsp vanilla

2 tsps baking powder

2 cups  (304 g) sifted flour

Combine poppy seeds and milk in a large bowl. Let stand at room temperature for three to four hours. Let butter and eggs warm to room temperature for easy mixing.

Grease and flour an 8 1/2 x 4 1/2 x 2 1/2 pan. Preheat oven to 350.

Add butter, eggs, sugar, vanilla, baking powder and flour to poppy seeds and milk. Beat at medium speed with electric mixer for 1 minute, scraping side of bowl with plastic spatula. Pour into prepared pan.

Bake in a moderate oven (350) for 1 1/4 hours or until centre springs back when lightly pressed with fingertips. Cool in pan on wire rack 5 minutes. Loosen around edges, turn out to cool. Sprinkle with icing sugar.

*my friend's handwritten recipe called for 1/2 cup  or (2 oz) but when I measured out 1/2 cup poppy seeds  I found this to be closer to 3 oz or 85 grams. All other bracketed measurements in grams are my own conversions using the volume amounts provided in the original recipe.


If you liked this post, and would like to receive posts like it directly to your inbox, why not sign up for my email updates here.


Custard & Crumble Plum Tart

The rain is here but there are still plums in the markets and this tart is a perfect way to say goodbye to summer and hello to the fall. The custard cooks into the tart and gives it a certain, shall we say, gooey-ness. This is based on a recipe from an old Martha Stewart book. My favourite thing about the original recipe was the almond flavour imparted by the almond extract. My version increases the amount of almond extract and doesn't use any vanilla extract. I use prune plums because I like the way the little sliced pieces look when I arrange them on the top of the tart, but  but larger ones will do.

Plum Custard Crumble Tart © 2014 Helena McMurdo
Pieces of Plum Custard Crumble Tart © 2014 Helena McMurdo

Custard & Crumble Plum Tart

Crust & Crumble Base

218 g sugar

1/4 tsp salt

114 g (4 oz) cold butter, cut into cubes

Mix and rub together the above ingredients until you have a coarse meal. Divide the mixture in half  (about 257 grams each half) and set aside. To the remaining half add the following:

3/4 tsp cinnamon

1/4 tsp baking powder

1 egg

Press the wet mixture into a 9 inch tart pan. Bake in 320 oven for 10 minutes, then remove from oven and let cool.

While the tart is baking, prepare the custard as follows:


Filling & Custard

1 1/2 lbs plums, sliced in half or in quarters

1 egg

125 ml whipping cream

56 g sugar

2 tsp almond extract

Additional sugar for sprinkling.

Arrange the plums in a pattern of your choosing on the surface of the cooled tart crust.

Combine the egg, cream, sugar and almond extract in a bowl and beat slightly with a fork or whisk. Pour over the plums. Sprinkle the crumb topping you set aside earlier over the plums. Sprinkle approximately 2 tsp sugar over that.  Bake in a 350 F oven for 30 minutes. Then turn on the broiler and watching carefully, brown the top .

(Use your judgement - I sometimes feel like the remaining topping is more than enough so I often freeze any remaining crumb topping. It's great to have on hand for those times when you need an instant dessert - Just sprinkle over some fruit and your are done!)