It's just not Christmas without Shortbread

Shortbread is one of my favourites. I like experimenting with different flavours. This recipe has a great base and can easily be adapted with the flavouring of your choice. I've made it before with Lavender, Cayenne or Moroccan Ras El Hanout. But this lemony version is quite nice I think. The lemon is subtle but definitely present.


IMG_4687.jpg

Lemon Shortbread

480 g (2 cups) butter

187 grams ( 1 1/2  cups) icing sugar

3/4 tsp vanilla

zest of 3 lemons

500 grams (4 cups)  all purpose flour

1 tsp salt

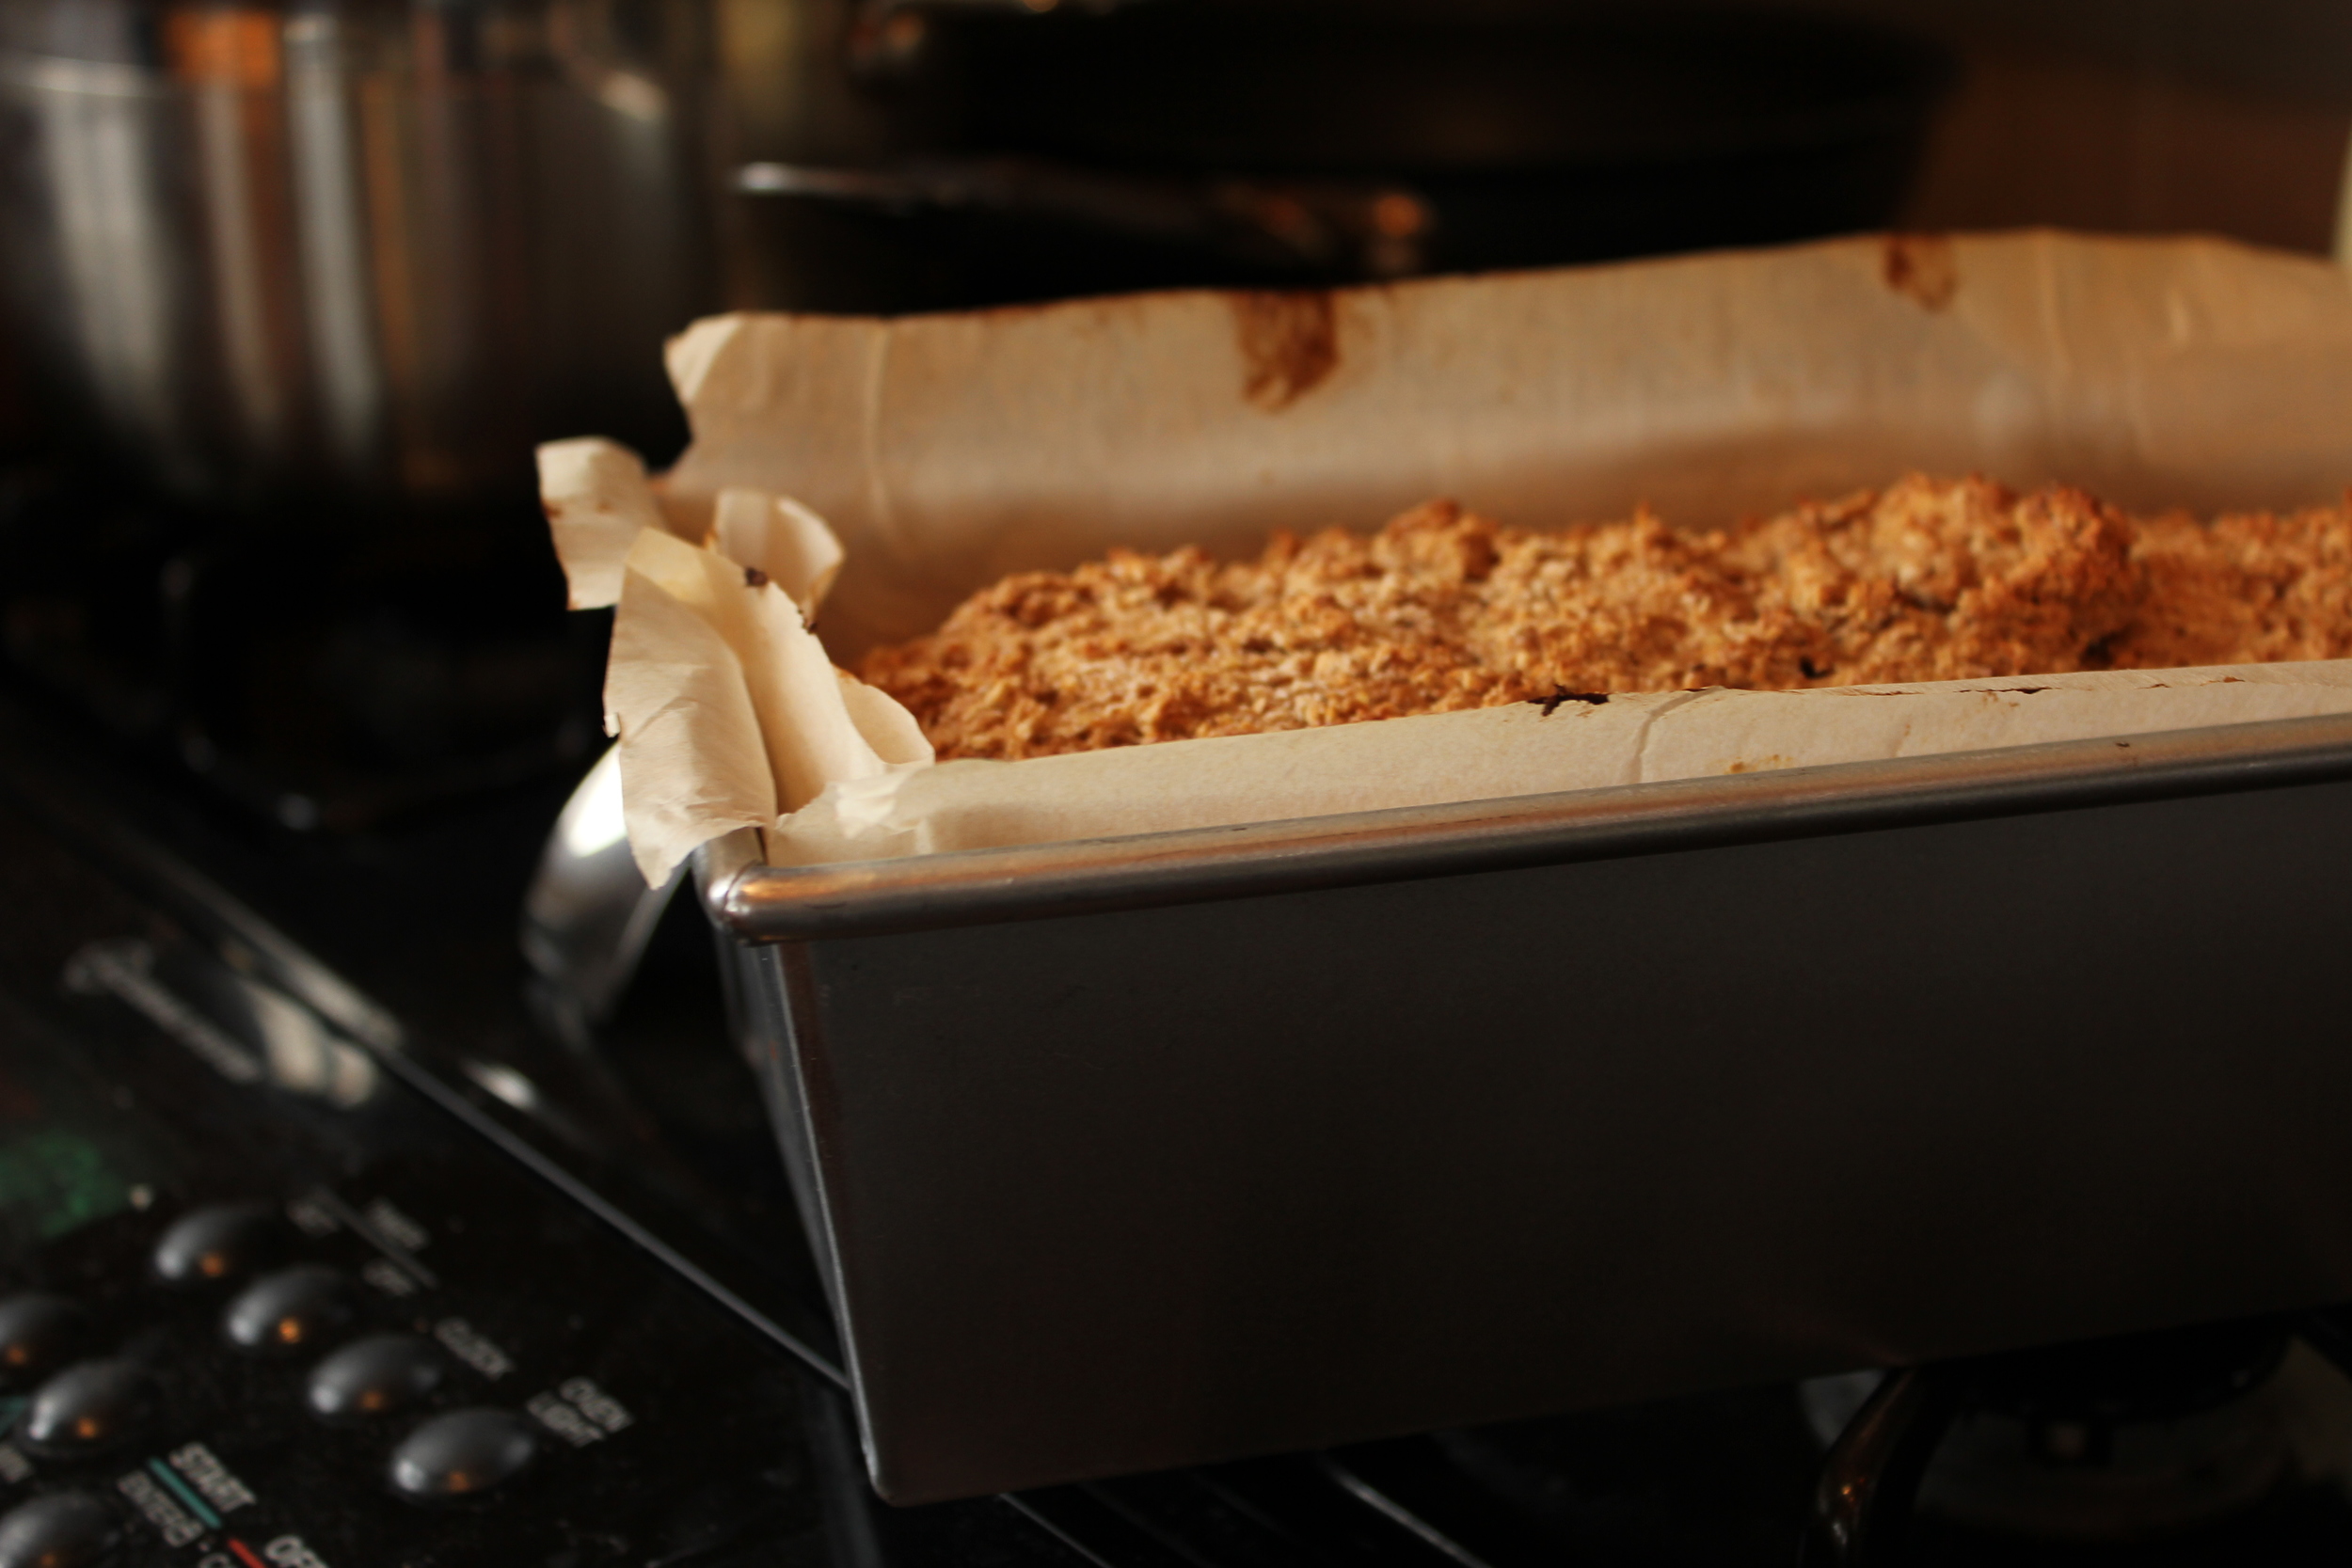
Zest the lemon and mix it in with the flour and the salt. Set aside.  Add in the flour in two parts, and mix until just incorporated. The dough forms large beads. At this stage, tip the dough onto a floured surface and form into 4 discs. Wrap in cling film and refrigerate until firm. (About 1 hour).

Preheat the oven to 300 F

Roll out the dough on a floured surface being careful not to overwork. The rolling pin is your friend, let it do the work without pressing too much. Roll to approximately 1/4 inch thick. Cut in to shapes of your choosing. With a floured palette knife, slide them off your work surface and onto a parchment lined baking tray. Chill in the fridge for approximately 20 minutes. Then cook one tray at a time in the centre of the oven for 20 minutes. I'm a bit intense about rotating the tray every five minutes but my oven tends to be a bit uneven. 

When you take the trays out, let the shortbread cool on the tray for a minute or two, then remove to a rack and let cool completely. Keeps for up to a week or make it now and freeze for Christmas!


Want to receive posts like this, right to your inbox? Just enter your email below and the elves will get on it.

Homemade Cranberry Sauce

CranberrySauce Mise © 2013 Helena McMurdo

Happy Thanksgiving everyone! Or at least to my fellow Canadians. Yes, we do it a month earlier than our friends in the US.  Maybe it's because we just can't wait to get into the cranberry sauce. Our family recipe contains just two ingredients: sugar and cranberries, (and it is very good) but for a change I thought I'd add some orange zest and cinnamon with very pleasing results.

684 g cranberries (about the equivalent of 3,  4 oz bags)

345 grams (1.5 cups) sugar

Zest of 2 oranges and the juice of 1

2 small cinnamon sticks

Wash the cranberries thoroughly and then put them in a large pan along with the other ingredients. Heat on high until the mixture begins to foam and the cranberries have popped open.  That's it. You are done. In our family we often make this on the day of the meal, (yep we are that organized!) so we just refrigerate it until we need it. Inevitably someone forgets to take it out of the fridge and actually put it on the table....but that's another story. If you want to can some, to keep for later, keep the mixture warm and pour into scalded jars, then process in a boiling water bath for about 15 minutes if you are at sea level, (20 mins for other climes). This recipe makes two 500ml jars. One for this weekend and one to give away or to save for Christmas.

Happy Thanksgiving!

Pear & Chocolate Almond Tart

Pear&AlmondTart©HelenaMcMurdo.jpg

I like dessert. I just do. In fact dinner doesn't seem finished until I've had it. Even if it's just a square of chocolate. Lately with all the fresh summer fruit that's around, I've been keeping some individual tart shells in the freezer so that I can experiment with different flavours and have dessert at a moment's notice.

The inspiration for this tart comes from some lovely Bosc pears that I collected for another project - a canned Pear and Vanilla preserve.  I had one lonely pear left and with it, was able to make these two lovely tarts.

The addition of chocolate seemed an appropriate nod to my almost namesake dessert Poire Belle Hélène. (When is chocolate NOT appropriate?)

These little tarts are rich and tasty and seem to be just perfect for the cooler weather.

Here's what you do for 4 tarts. (I halved the recipe to make 2)

Pastry

200 g (1 1/2 cups + 2 TBSP) all-purpose flour

50 g  (1/3 cup) ground almonds

75 g (1/3 cup) granulated sugar

160g (11 TBSP) salted butter at room temperature, cubed

1 egg yolk

Rub together with your fingertips, the flour sugar and butter until the mixture resembles coarse meal. Add the egg yolk and work through together with your hands. Turn out on to a floured surface and work it together into a smooth ball. Wrap in plastic wrap and place in the fridge for 30 minutes to rest. When the time has elapsed take the dough out of the fridge and wait for 10 minutes before rolling it out. I roll it between two sheets of parchment paper and then mark a circle around the tin and then use a palette knife to separate the pastry from the parchment, finally using the parchment to flip it into the tin. Line the individual tart shells. You can make the pastry in advance and freeze in the individual tart shells or freeze any extra pastry that you have. If you are working from frozen, take the shells out of the freezer about 1/2 an hour before you want to use them. If you are working from fresh, refrigerate the pastry shells while you make the filing.

Filling

56 g  (1/4 cup) butter

70 g (1/2 cup) powdered sugar

85 g ( 3/4 cup) almond flour/meal

1 TBSP all-purpose flour

1 egg

50 g chocolate (70% cocoa)

2 small Bosc pears

25 g  (1/8 cup) granulated sugar

1/2 tsp cinnamon

Slice the pears in half lengthwise and remove the core from each half with a melon-baller or spoon.  Now slice finely lengthwise, keeping the slices together and place on a plate. Squeeze some lemon juice over the slices to keep from browning while you make the rest of the filling.

Melt the chocolate slowly over a double-boiler while you make the filling (or cheat like I did and do it in the microwave.)

To make the filling, combine the butter and icing sugar until light and fluffy. Beat in the  flour and almond flour followed by the egg and the almond extract.

Divide the filling between the tart shells and spread evenly into each. Divide the chocolate between the shells, dropping it in spoonfulls over the filling. Run a knife through the chocolate to mix it slightly into the filling. Now place your pears, keeping the fine slices together in the centre of the tart shell and press down slightly so that the filling squeezes up around the sides and the slices separate ever so slightly. Combine the granulated sugar and cinammon and sprinkle over the pears.

Bake in a 325 oven for 50 minutes or until the pastry is nicely browned and the almond filling springs back when touched.

Now taste it. You're welcome!

Pimientos de Padrón

Os pementos de Padrón, uns pican e outros non - Galician Saying Translation: Some are hot. Some are not.

I love these. Perhaps I'm biased. They are pretty much considered the national dish from the land of my birth. That's Galicia - in the northwest of Spain. Notice the quote? Not quite Spanish is it? Yep, that's Galego. Named for the town of Padrón, most of these tiny peppers are sweet and mild. The odd one is not. It's  hot. Very hot. There may be tears. Consider yourselves warned.

On a recent trip to Galicia, I ate these little beauties almost every day. Next to jamón, they are probably my favourite local thing. At a bar in the spa town of Caldas de Reis, after arriving a little too late for lunch we were offered a lovely plate of these and a massive mountain of bread. A satisfying meal with an element of gambling thrown in. What is not to love? At the time it was early spring, when typically the peppers contain less of the spicy compound capsaicin,  and we were hard pressed to find a hot one among the batch we ate. Even though we had no "winners", they were delicious nonetheless.

Pimientos del Padrón y Pan ©2013 Helena McMurdo.jpg

Up until recently, it was hard to find these outside of Spain. Lately I've seen them regularly in blog posts from New York and yearn for them wistfully. I  chanced upon some in Portland, Oregon a couple of years ago at Toro Bravo.  I saw them in Seattle for sale. But I had never seen them in Vancouver.

So imagine my delight when I stumbled across them at the Trout Lake Farmer's market. The lovely people from Klippers Organics of Cawston BC had a load of them. And I am told, they are the only ones growing them in Canada.  Fill me up. I was a pretty happy girl leaving the market with my peppers in tow.

Pimientos de Padrón ©2013 Helena McMurdo.jpg

Fry them quickly in olive oil, toss them with some sea salt. Nothing more is required.

Fried Pimientos de Padrón ©2013 Helena McMurdo.jpg
Pimientos de Padrón with Maldon ©2013 Helena McMurdo.jpg

It's September or maybe it's the way they are grown here but I found the majority of these were hot and yes there were some tense moments. But they were good. So good. When can I get more?


Want to receive posts like this, right to your inbox? Just enter your email address below and it shall be done.

Blueberry Apricot Custard Crumble Tarts

BlueberryApricotTarts©2013HelenaMcMurdo.jpg

So I'm sitting here writing this and there is literally sweat pouring down my temples and I'm wondering who in their right mind would attempt to bake anything on a day such as this. I arose early and was actually glad to see a cloudy sky thinking...ahhh some coolness.  This combined with an unexpected and very welcome gift of local blueberries on Friday night and the presence of a couple of apricots on my counter which in the words of my mother 'needed eating' sparked the idea.  Add to this the fact that I knew that way back, in the depths of my freezer,  were two beautiful previously prepped tart shells and we now had the perfect storm of conditions for my baking madness. So the oven was already preheating by the time I realized this was not going to be the cool day I had imagined. Oh well suck it up. I love it when conditions and and ingredients spring up to magically provide a recipe so here's what I came up with. Blueberry and Apricot Custard Crumble Tarts. A mouthful, you say? Yes it is. And you will like it.

I recently made a lovely lemon tart using a pâte sablée from one of my favourite books Classic Artisan Baking by Julian Day. This has become my new very favourite pastry. It is rich and buttery and almondy and well, it's just perfect. And it freezes very well so when I had some leftovers I immediately pressed them into two tart shells for future use and popped them in the freezer...where I found them today.

The other gift that allowed this to happen today was a crumble mixture that I also keep on standby in the freezer. I inevitably have too much of it whenever I make it and the first time this happened I froze it. It happened by accident the first time but the results were so good that I admit that now I make it in advance and always have some on stand by. I mean who knows when you could be called upon to provide a crumble at a moment's notice.  Don't say I didn't warn you.

Finally, this dessert makes use of a custard filling which I think is one of the loveliest parts of this dessert. It gives it a kind of bread-puddingy-ness (Yes, of course it's a word).

Blueberry Apricot Custard Crumble Tarts

For 4 tarts you will need:

Pastry

4  (4 inch) tart shells lined with your favourite pastry. I used pâte sablée from Classic Artisan Baking.  Before discovering this pastry I had no qualms of buying store-bought pastry (shock-horror!)  from people who were far better at pastry making than I was.  I like a sablée pastry for the almond flour which gives it such a richness.

You will need to follow the directions for your pastry and blind bake it. Usually this involves covering the shells with parchment or foil  and filling with baking beans before baking for about 15-20 minutes. (Depending on your pastry). Remove the beans and parchment and bake for another 5 minutes or so to slightly brown the pastry.  Remove from the oven and set aside to cool.

Custard Filling

1 egg

1/4 cup / 6o ml whipping cream

1 TBSP sugar

pinch of cinnamon

dash of vanilla or almond extract

Lightly beat the egg, add the cream and other ingredients, whisk and then set aside until needed.

Crumb Topping 

(makes more than enough to save for later)

1 cup / 227 grams sugar

1/4 tsp salt

1/4 lb / 113 grams cold butter

1/4 cups / 156 grams all-purpose flour

Combine first three ingredients cutting in the butter until the mixture resembles a coarse meal. Add the flour and rub together with your fingertips until the mixture has the texture of fine breadcrumbs.  Set aside until ready to use. Freeze what you don't use to for the crumbles of your future. (Just top your fruit with the mixture and you are good to go).

Fruit Filling

about 1  cup of blueberries

3 apricots, sliced

To assemble:

Once cool, fill the tart shells with a single layer of blueberries, then arrange the apricots on top to your liking. I used 5 apricot slices per tart but you could use more. Then fill in the holes/gaps with more blueberries.  Depending on how sweet your fruit is, you may want to sprinkle some sugar on the fruit at this stage. Taste it and make a call. Now pour the custard mixture over the tarts until the level of custard is just shy of the top of the pastry case. (Stir the custard before pouring as it may have settled). Finally sprinkle some of the crumble mixture on top. Really this part is up to you depending on how much crumble you prefer but I used about 2 TBSP per tart.

Bake at 350 until the crumb topping is golden brown and the custard and fruit juices are bubbling up through the top of the crumb.

Eat and enjoy while mopping the sweat from your brow and thinking how very clever you are!

Inspiration: Peas and Ham

Image

Image

So all this revisiting of my recent trip has given me a craving for some simple Spanish cooking here at home in Vancouver. I was at Granville Island yesterday and spotted some lovely English Peas and thought - peas and ham. And by ham, I mean Serrano. Claro. I can always count on Oyama Sausage Company for some of the good stuff.

There is something so simple and  satisfying about this dish. Fresh peas are boiled and then tossed with bits of ham in a sauce of nothing more than olive oil, pimentón and garlic. A bit of bread to mop of the smoky, scented oil and a glass of wine and you've got something truly delicious.

You will need:

About 3 Cups fresh, shelled English peas

100 grams Jamón Serrano cut into little bits (like lardons) (I bought these pre-cut from Oyama Sausage Company which saved me lots of time).

3-4 TBSP Olive Oil or more

2 Garlic Cloves, flattened and blistered with the back of a knife

Approx 1 TBSP Hot Smoked Paprika (Pimentón Picante)

Ok. So now we have to talk about Pimentón. You may or may not know that there are three types of Smoked Paprika from Spain: Dulce (Sweet), Agridulce (Bittersweet) and Picante (Hot). Where I live in Vancouver, I find it is more often the Dulce or Agridulce varieties that are on shelves. Picante can be hard to find but it is my preference in this recipe. In our family, this item is something that tucked into a Christmas stocking, can make someone very happy. So grab it when you see it.

The method is simple.

Boil the shelled peas until they are tender. How long? I have no idea. Keep tasting them until they taste good to you.

In the meantime, heat the olive oil and fry the garlic and ham very gently, just browning the ham. When the ham is done, remove it and let it drain on some paper towel (or not). Keep frying the garlic, pressing on it with a back of a spoon to mush it up. The purpose here is simply to flavour the oil. You will actually remove the garlic when serving. I know it can seem like a lot of oil. It is. But most of it is going to settle to the bottom of the dish and you are going to mop it up with your bread. You'd eat as much when you dip your bread in oil at an Italian restaurant and you wouldn't even think about it.

Just before the peas are about to be ready, remove the pan with the oil from the heat, remove the garlic and add the pimentón. The pimentón will fry very vast in the hot oil so keep stirring constantly. Quite quickly the oil will cool. At this point, you can set the pan aside. Now the peas will be done. Drain them and combine with the pimentón oil mixture. Easy peasy. Did I just say that? Oh boy.

PeasandHam2 ©2013 Helena McMurdo.jpg

So there you have it. I hope you will try this with some fresh local peas. Let me know how it goes. I would love to know.

BC Spot Prawns with Garlic Cream Sauce

It's officially my favourite time of the year. Spot Prawn season. It's short usually lasting around 60 days but this year it will be even shorter. So it's a get-em while you can scenario. I don't usually do much with them. Fry em up on a hot pan and I'm done. They are naturally sweet and a feast in themselves. For a change I thought why not try them in an actual recipe so I prepared a pasta with the little beauties. It's pretty rich but sometimes that's a good thing right?

BC Spot Prawns © 2013 Helena McMurdo.jpg

BC Spot Prawns with Garlic Cream Sauce

Ingredients:

12 BC Spot Prawns

250 grams Linguine

20 grams butter

2 garlic cloves, pressed

60 ml white wine

125 ml cream

pinch of cayenne

salt & pepper

1 egg yolk

1. Prepare the prawns by dropping them in boiling water for 60 seconds. Take out immediately and plunge into an ice bath to stop the cooking process.

2. Peel the prawns, remove the heads and set aside the tail meat on ice or in the refrigerator.

3. Prepare the pasta according to package directions (mine was 11 minute cooking time). About halfway through cooking time begin your sauce.

4. Melt the butter in the pan and fry the garlic, add the wine and reduce to half the quantity.

5. Add the cream and thicken. Season with salt and pepper and the cayenne.

6.  Add a tiny bit of the cream mixture to the egg and beat so that it does not become scrambled.Pour the remaining cream mixture into the egg yolk beating vigorously.

7. Return cream mixture to the pan, add the spot prawns and warm through (a minute should do it).

8. Drain your pasta and add to the pan. Coat the pasta with the sauce and serve.

What's your favourite way to prepare  spot prawns?

Local Quince = Spanish Membrillo

Quince. © 2011 Helena McMurdo

Score! My good friend recently treated me to some quince from one of Vancouver's farmer's markets. This fruit is often overlooked because it can't be eaten raw. But it is very rich in pectin which makes it perfect for jams and jellies or in Dulce de Membrillo, one of my favourite treats. Ok I'll be honest here, the reason it's one of my favourites is that it gives me an excuse to eat cheese! Membrillo is the Spanish word for quince but the word is also used to refer to quince paste, the sweet, floral, gel-like confection, which pairs so nicely with Manchego cheese and which kids in Spain spread on their toast.

The fruit themselves are a bit strange looking, sort of a cross between an apple and a pear, and covered with an unusual fuzz which would seem to be unique to quince. It seems that removal of this fuzz, results in the quince turning brown, so keep it on.

When I'm making membrillo for immediate use, I usually buy 1 -3 pieces of the fruit and make a small batch which I can let set in a shallow cake pan. This makes it easy to slice up and use for pairing with cheese. On this occasion, as I had a number of fruit to work with, the yield was more than I could hope to eat in a few sittings so this gave me the opportunity to make use of some Weck canning jars which I've been eager to try, and make a larger batch which I could put by for future use.

helenamcmurdo_weckjars

The Weck jars feature  a glass lid which fits over a rubber ring. During the canning process, a pair of stainless steel clips are fitted to the lid to keep it in place. Once the vacuum seal has been enabled, through the use of a boiling water bath, the clips are removed and the vacuum seal keeps the lid in place. Simple technology. Love it!

Dulce de Membrillo © 2011 Helena McMurdo

Dulce de Membrillo (Quince Paste)

1 kg quince, cored, peeled and diced

600 g sugar

Place the quince in a pot and cover with sugar and allow to macerate overnight or for 8-10 hours. This will draw the pectin and liquid out of the fruit.

Cook the macerated fruit on a low heat stirring from time to time, and more frequently as it gets thicker.  (About 1 - 1.5 hours) Once the fruit is very thick and mostly broken down, you may, if you like, use a hand mixer to purée the quince. Be very careful with the heat and make sure you keep stirring the paste as it can burn easily at this stage. Pour into molds or a shallow cake pan lined with parchment or clear plastic and let cool. Keep in the refrigerator for up to 3 weeks.

Serve in slices or small cubes with equally sized pieces of cheese. Spanish Manchego is traditional but membrillo also tastes great with a strong, sharp cheddar.

If you want to modify the quantity, you can do so easily - just make sure you keep the same ratio of sugar to fruit.

This recipe comes to me from a friend in Galicia, Spain. (Patience not being one of my virtues, the addition of the hand-mixer is mine!)

Bring on the Recipes!

I met the lovely and creative Jasmine Bradley back in February when we both attended a food photography workshop with the amazing Clare Barboza in Seattle. It was then that I found out about Jasmine's fantastic website Cook that Book, where she has turned her love of cookbooks into a useful resource for all of us by providing interesting and useful real world reviews of the cookbooks we all covet. So when the chance came up, I was very honoured to have the opportunity  to work with Jasmine and contribute to her great site.  My first review will be of Donna Hay's Seasons - a book I've spent a lot of time with in the last year - to the detriment of my waistline. Here are a few of the shots from my review.

CookThatBookReview_pumpkin_montage

.

CookThatBookNectarine_edited-1

Please check out the full review here.

We've got some exciting books coming up so please check back soon.  Also, if you have a favourite new cookbook, please share!

Beef & Guinness Stew with Irish Brown Bread

IMG_2193

So if I haven't mentioned it before, I lived in Ireland for close to 9 years and in that time became a great lover of all things Irish, with the cuisine being no exception. So in honour of St. Patrick's day, I'm treating myself to some hearty Irish goodness inspired by my great friends in Ireland.

Please note, Beef  & Guinness Stew is NOT Irish Stew.  Irish Stew uses lamb and a stock base, and is more soup like. While I'm a huge fan of classic Irish Stew,  I'm quite fond of the Beef & Guinness stew for its hearty richness.

Irish Soda Bread. You will find both white and brown versions in Ireland. In the areas where I lived, brown soda or simply Irish Brown Bread was more popular. Butter is in my opinion the essential accompaniment. Soup and a slice of this bread. It's all you need for a delicious and filling lunch.

IMG_2237

Beef & Guinness Stew

My recipe is not very exact but I'll do my best to put it down as best I can.

1 lb stewing beef

1 pint Guinness

2 cups beef stock

1-2 carrots

1/2 large onion

2 stalks celery

6-8 mushrooms

Bouquet Garni of Rosemary, Thyme, Parsley

Roll the meat in seasoned flour, brown in small batches in a large casserole.  Set aside.

Add vegetables to casserole and coat with pan juices, softening for about 5-10 minutes.  Add the meat and juices back to the pan. Slowly add the pint of Guinness a little at a time, to build a rich gravy.  Cover with stock.

Cover and simmer for 2-3 hours in a slow oven.  (That'd be an expression I learned in Ireland for not very hot - say 250 - 300 F)

IMG_2288

Irish Brown Soda Bread

This recipe comes courtesy of my friend Oonagh (pronounced Oooh-NAH).  It is the easiest thing in the world to make and takes less than 10 mins to mix. (The hardest part is to line the tin). It's handy to have a kitchen scales for this recipe as the quantities are given 'Irish style' as weight, not cups like we use in Canada.

1. Line a bread tin with wax paper or baking parchment

2. Mix these dry ingredients together: 1 lb whole-wheat flour 2 oz Oat Bran 2 oz Wheat Germ 2 oz steel-cut oats 2 tsp Salt 1 1/2 tsp Baking Soda 1 tsp Baking Powder

3. In a separate bowl mix these wet ingredients: 1 TBSP Brown Sugar 1 Egg 1 TBSP OIL

4. Add Wet ingredients to Dry Mixture.

5. Add in 500 ml (roughly 1 pint) Buttermilk and mix lightly and quickly with spoon or fingers and place mixture in baking tin.

6. Bake at 400 F for 1/2 hour and then reduce heat to 350 F and bake for another 1/2 hour.

To serve, I'm partial to cold butter on the bread once cooled rather than melted butter. Try it and let me know.

IMG_2221

IMG_2221

OPTIONS / NOTES: I sometimes throw in a bunch of flax seed to the dry ingredients which makes it quite nice. Other note - in Ireland they have something called coarse meal flour which I have had no success finding in North America.  You can experiment by reducing the flour quantity slightly and topping up to the 1 lb measurement with wheat bran or additional wheat germ. The basic recipe works just fine though. When I'm making this I mix the dry ingredients the night before and then quickly add wet ingredients in the morning for fresh bread at breakfast.

IMG_2269

IMG_2269

Happy St. Patrick's Day. Beannachtaí na féile pádraig. And to all my friends back in Ireland, thinking of you and missing you much!

Caraway Seed Cake

P1000178

This recipe is inspired by a good friend in Ireland. Actually she was my former boss. I  have to hand it to her in terms of providing excellent office perks. Every day at 10:30 or 11:00 we'd break for tea and she would often bring in some of her own home baking to share.  This was one of my favourites, and something that I had never encountered in North America. Seed Cake is quite popular in England and Ireland and the recipe goes back as far as Mrs. Beeton's original cookbook. If you like caraway you'll love this.

My friend told me to use a simple Madeira recipe and simply add Caraway seeds.  Madeira cake is not something very popular in North America but you can find lots of recipes online.  It's similar to a pound cake, although a bit lighter in texture.  Some recipes call for madeira, some do not. I ended up combining a few versions.

Here's what I did:

6 oz butter

6 oz  granulated sugar

3 eggs

8 oz all-purpose flour

1 tsp baking powder

1/2 tsp salt

1/4 tsp baking soda

2 tsp vanilla (this is what I used on this occasion but you could also use zest + juice of one lemon instead for a lemony version)

1 1/2  tsp caraway seeds

Combine the flour, baking powder, salt and baking soda and set aside. Cream the butter and sugar. Add the eggs one at a time, adding a spoon full of the dry ingredient mixture with each egg.  Add remaining flour mixture and once fully combined add the vanilla (or lemon flavouring) and fold in the caraway seeds.  Bake in a loaf tin at 350 degrees for 55 to 60 minutes or until a toothpick comes out clean.

Perfect with tea at the office or at home. Enjoy!

Winter Warmer

It's snowing today in Vancouver and the whole place has the look of a Winter Wonderland.  Being somewhat of a cold creature, I head for the indoors on days like this, staying close to the fire. Although it's pretty early, I'm already thinking about how I will warm up later.  Hot Port is  one of my favourite drinks from my days in Ireland where on cold days, this was the perfect remedy, always taken close to the peat fire.

So these days I'll settle for a gas fire and the 'pub' will probably be my living room but I think I can probably recreate the authentic hot port.

To make:

Fill a wine or brandy glass with a 2.5 oz measure of port.  It doesn't need to be your best.  Most bars in Ireland use something like Sandeman Ruby Port for this application.

Drop in one sugar cube

Add about 1 oz of boiling water.

Garnish with a clove studded lemon.

Enjoy under a down blanket or ask an obliging bar tender to make for you.