Spring for Leek & Potato Soup

I can confirm that we are most definitely still experiencing what some have called Cool Spring here in Vancouver. 

Trailing Cherry Blossoms. Photo © 2014 Helena McMurdo

The first blossoms are coming out and the sun does poke its head out from the clouds, but there is still a chill in the air. I'm not ready to bare my legs just yet. In fact a cozy cowl neck  would suit me just fine. And to eat, I crave something warm and nourishing. This Leek and Potato soup is not revolutionary but it is simple and comforting and feels just right at this time of year.

Nourishing Leek & Potato Soup. Photo © 2014 Helena McMurdo

Leek & Potato Soup

4 potatoes (I used Yukon gold)

4 leeks (white and pale green parts only)

1 onion

500 ml chicken stock

salt & pepper to taste

Peel and dice potatoes. Coat with olive oil and roast in the oven until tender (10 to 20 minutes depending on your dice). In the meantime, finely chop an onion and sauté in olive oil on low to medium heat in a large saucepan. Clean the leeks thoroughly to remove any sand or dirt. Finely slice the leeks and and add to the onions. Sauté until soft and buttery. Add the potatoes and the chicken stock and simmer until all vegetables are soft. At this point remove from heat and cool slightly. Use a hand blender to purée the mixture. If you are eating the soup right away, add a little milk to taste and until you have a consistency that you like. If you would like to freeze the soup, I suggest omitting the milk. It can be added later on when you are ready to eat.

Enjoy. I'm sure Warm Spring cannot be far away.

The Full Irish

Irish Breakfast. There's much discussion of what items constitute the essential components of an Irish Fry. Eggs, bacon, sausage, white and black pudding certainly but after that there is debate about beans, mushrooms, tomatoes. 

Eggs in the early morning light  © 2014 Helena McMurdo

I will choose to use a description that I came upon one day about 12 years ago, while I was still living in Ireland. I was travelling down from the west of the country to Dublin, as I did quite often for my job. What was different on this occasion is that I was on the Galway road, the N6, a route I rarely took and so I didn't have access to my usual trusted stopping points. Somewhere between Mullingar and Dublin, Enfield perhaps, I decided to stop for breakfast. To be honest, I don't remember where it was. I just remember that I was starving...and when I came across a row of houses and a small sandwich board stuck out on the road, I didn't care where I was. I was stopping. It was one of those houses that you knew by the outside, you might find anyone or anything inside. I held my breath and stepped inside, the low roof dangling over my head and although the room was dark, which was disconcerting, I was pleased to see a few burly builder types inside. In Ireland, their very presence is taken as an indication of a good breakfast so I was immediately reassured. The lady of the house seemed to be an old woman. I say seemed because she didn't show herself.

Eggs with Irish Bacon © 2014 Helena McMurdo

"Just sit down wherever you like", she yelled from behind the swinging door of her kitchen. "The only thing is, we've got no breakfast".

No breakfast? I was confused as I watched the burly builders dip their sausages and bacon into their eggs and stuff them in their mouths.

"Well", she continued, "the power's gone out and we've no 'lectricity. So I've got no toast. But I can make you bacon, eggs, sausage, pudding".  

"Isn't that breakfast?", I queried.  

Deadly serious, "Of course not, there's no toast!"

So there you have it. The essential component of an Irish Fry at least the breakfast version is toast.  Or Irish brown bread. Or both.

Because you don't make this as much as prepare it, it's essential to have the best quality ingredients you can. Something about the quality of ingredients in Ireland makes this dish extra special. They have long been at the forefront of the idea of eating local and producing food in a sustainable way. But I'm pleased to say that as knowledge of locally produced foods has grown here in Canada, I'm more easily able to find beautiful locally produced substitutes, done in the Irish style.

Knowing that St. Patrick's Day is on it's way, and deeming that a reasonable excuse,  I ventured to The British Butcher in North Vancouver, knowing that I would find the essential ingredients I required.

Their Irish bacon is from BC pork and dry cured in house. One of the things I find when buying this style of bacon here is that not every type crisps up nicely. Sometimes it has too much water and it just doesn't brown nicely. Not the case here. The flavour was great and it crisped up beautifully. Black and White Pudding are made here locally, also from BC pork. I love the white pudding particularly. I tend to cook it quite a lot so that the oats inside get crunchy. Delicious. I also enjoy the black pudding although I probably don't hanker it for the same way. Yes, it's got blood in it but if you've read this far, I'm guessing you already know that.

Black and White Pudding © 2014 Helena McMurdo

The pro tip that I learned from the Irish is that as far as the bacon goes - better to grill than fry. Two reasons: one is less grease. The second is that you can make more all at once. In fact I often also put the sausages and the black and white pudding on the grill pan and under the broiler vs frying them in a pan. This is especially helpful when cooking for a crowd.

Full Irish © 2014 Helena McMurdo

For me, an essential component of the Full Irish, is a roasted tomato. After all a vegetable or two couldn't hurt. Happy St. Patrick's Day! Lá fhéile Pádraig sona dhuit!

Pancake Tuesday. Finally.

It's here. Pancake Tuesday. Only Christmas can garner more excitement from me than this day. When we were young, we started asking my mum and dad in February, "Is it Pancake Tuesday yet?" The reason: my mum's special crêpes. With my English Dad and my Spanish Mum, Pancake Tuesday became a hybrid holiday. The English tradition of eating pancakes on Shrove Tuesday, with my Mum's Galician Filloas.  Filloas are basically a crêpe, but an eggy crêpe, that is strong an delicate at the same time. Stacked in lacy layers, we sprinkled them with sugar, rolled them up and ate them until we could eat no more.

Filloas (Galician Crêpes) © 2014 Helena McMurdo

When we visited my grandma in Spain, we were impressed by her prowess with these crêpes. We wondered how she knew how to make these? Had my mum taught her? We watched as she greased the pan with an end of bacon, the grease clinging to the hot surface, and then ladled the perfect amount of batter into the pan and swirled it round coating the pan with the perfect crêpe. But here is where her technique diverged from that of my mum's. With the first side cooked, she would flip the crêpe out on the top of her flat top wood fired stove for the second side to cook. Naturally this allowed her to make them very quickly and for us to eat more! We also discovered that she didn't only make these on Pancake Tuesday, but would make them any time we asked. 

Filloas (Galician Crêpes) Mise en Place © 2014 Helena McMurdo
Batter for Filloas (Galician Crêpes) © 2014 Helena McMurdo.jpg
Cooking Filloas (Galician Crêpes) © 2014 Helena McMurdo.jpg
A Spoonful of Sugar © 2014 Helena McMurdo.jpg


I still love these like I did when I was a kid that is to say with sprinkled with sugar, rolled up and gobbled down but now that I'm a grown-up I am willing to try a squeeze of lemon as well and eat it with a knife and fork occasionally.

Stack of Filloas (Galician Crêpes) © 2014 Helena McMurdo.jpg
Filloas (Galician Crêpes), Detail © 2014 Helena McMurdo.jpg
Stack of Filloas (Galician Crêpes) with Lemon © 2014 Helena McMurdo.jpg

Filloas (Galician Crêpes)

6 eggs

500 ml milk

250 ml water

lemon zest

pinch of cinnamon

pinch of salt

250 grams flour

Beat the eggs and then add the other ingredients, mixing together until smooth. You can do this with a whisk or with a blender if you wish. 

Heat a cast iron or other non-stick pan and brush lightly with butter. (Unless you do happen to have an end of pancetta or bacon fat hanging around). Add just enough batter so that when you swirl it round in the hot pan it just covers the entire surface.  After approximately one minute, you should see that the surface of the crêpe will dry up and little bubbles will form. The edges of the crepe will also pull away from the sides of the pan. Time to flip! Be fearless and  insert a small off-set spatula underneath the crêpe and flip it quickly to cook the other side. Continue in this manner until you have a lovely stack. If you are eating them as you go, this will never happen. You can make these in advance and freeze them or stick them in the fridge and eat them the next day.  I am perfectly happy to eat them at room temperature but they can be easily warmed by flipping them quickly on a hot pan.

Garnish as you see fit. But please at least try them with nothing more than a  sprinkling of sugar.

Eat, Drink & Be Merry

Wishing you all, wherever you may be a very Merry Christmas the love of family and friends and all the pleasures of the season.  

© 2013 Helena McMurdo

It's just not Christmas without Shortbread

Shortbread is one of my favourites. I like experimenting with different flavours. This recipe has a great base and can easily be adapted with the flavouring of your choice. I've made it before with Lavender, Cayenne or Moroccan Ras El Hanout. But this lemony version is quite nice I think. The lemon is subtle but definitely present.


IMG_4687.jpg

Lemon Shortbread

480 g (2 cups) butter

187 grams ( 1 1/2  cups) icing sugar

3/4 tsp vanilla

zest of 3 lemons

500 grams (4 cups)  all purpose flour

1 tsp salt

Zest the lemon and mix it in with the flour and the salt. Set aside.  Add in the flour in two parts, and mix until just incorporated. The dough forms large beads. At this stage, tip the dough onto a floured surface and form into 4 discs. Wrap in cling film and refrigerate until firm. (About 1 hour).

Preheat the oven to 300 F

Roll out the dough on a floured surface being careful not to overwork. The rolling pin is your friend, let it do the work without pressing too much. Roll to approximately 1/4 inch thick. Cut in to shapes of your choosing. With a floured palette knife, slide them off your work surface and onto a parchment lined baking tray. Chill in the fridge for approximately 20 minutes. Then cook one tray at a time in the centre of the oven for 20 minutes. I'm a bit intense about rotating the tray every five minutes but my oven tends to be a bit uneven. 

When you take the trays out, let the shortbread cool on the tray for a minute or two, then remove to a rack and let cool completely. Keeps for up to a week or make it now and freeze for Christmas!


Want to receive posts like this, right to your inbox? Just enter your email below and the elves will get on it.

You've Come to the Right Place

Welcome! Yes, you may have noticed Endless Picnic has a new look. Yes it was time. When I started this blog more than 3 years ago, it was simply because I wanted to record a trip to Spain and share it with my friends and family. Three years on, I've been on lots of interesting journeys through this blog and because of it had the opportunity to work and collaborate with some great people. What started out as a desire for a better presentation of my food photos has led to the launch of my "official' photography site a few weeks ago.  I'm so grateful for the following of my readers and for the encouragement and advice of good friends and teachers during this journey. The time seemed right to give my Endless Picnic a bit of a revamp too, to better reflect where I am now and all that has happened.

The stories will continue and I hope you'll be here with me.

Out from the Fog

Misty Tree

Recently,  Vancouver was covered in a blanket of fog. It made me very nostalgic, reminded me of my time in Ireland. Here in Vancouver fog does happen, but not that often.

It stayed for about a week and so I enjoyed many early mornings in the still and calm. The thing that struck me most, was how quiet the city became. The fog seemed to suck all the noise of the city into its folds and hold it there breathless.

Image

One one morning when I was out at Vanier Park, the fog was moving quite a lot and the light was changing fast. I took this shot at about 8:45. I like how mysterious it is.

KitsilanoFog_© 2013 Helena McMurdo

By 5 minutes past nine, the fog burned off for just a brief moment and I shot this with just a peek of the city.

Kits Point©HelenaMcMurdo

Finally, the last few ones have been big ones for me as I finally launched my online food photography portfolio. It's been an interesting journey to work through the images and to decide what I would include. I think I've managed to put together a collection that best represents my food photography style. I hope you'll check it out.

I'm also working on a new look for this blog. When I started this blog 3 years ago, I didn't know where it would take me. It's been a very eye-opening journey and I've been fortunate through this blog to be led in paths I didn't even imagine. So now I feel the time is right for a bit of a revamp. I'll keep you updated and hope to reveal something soon.

All the best to you until then.

Homemade Cranberry Sauce

CranberrySauce Mise © 2013 Helena McMurdo

Happy Thanksgiving everyone! Or at least to my fellow Canadians. Yes, we do it a month earlier than our friends in the US.  Maybe it's because we just can't wait to get into the cranberry sauce. Our family recipe contains just two ingredients: sugar and cranberries, (and it is very good) but for a change I thought I'd add some orange zest and cinnamon with very pleasing results.

684 g cranberries (about the equivalent of 3,  4 oz bags)

345 grams (1.5 cups) sugar

Zest of 2 oranges and the juice of 1

2 small cinnamon sticks

Wash the cranberries thoroughly and then put them in a large pan along with the other ingredients. Heat on high until the mixture begins to foam and the cranberries have popped open.  That's it. You are done. In our family we often make this on the day of the meal, (yep we are that organized!) so we just refrigerate it until we need it. Inevitably someone forgets to take it out of the fridge and actually put it on the table....but that's another story. If you want to can some, to keep for later, keep the mixture warm and pour into scalded jars, then process in a boiling water bath for about 15 minutes if you are at sea level, (20 mins for other climes). This recipe makes two 500ml jars. One for this weekend and one to give away or to save for Christmas.

Happy Thanksgiving!

Pear & Chocolate Almond Tart

Pear&AlmondTart©HelenaMcMurdo.jpg

I like dessert. I just do. In fact dinner doesn't seem finished until I've had it. Even if it's just a square of chocolate. Lately with all the fresh summer fruit that's around, I've been keeping some individual tart shells in the freezer so that I can experiment with different flavours and have dessert at a moment's notice.

The inspiration for this tart comes from some lovely Bosc pears that I collected for another project - a canned Pear and Vanilla preserve.  I had one lonely pear left and with it, was able to make these two lovely tarts.

The addition of chocolate seemed an appropriate nod to my almost namesake dessert Poire Belle Hélène. (When is chocolate NOT appropriate?)

These little tarts are rich and tasty and seem to be just perfect for the cooler weather.

Here's what you do for 4 tarts. (I halved the recipe to make 2)

Pastry

200 g (1 1/2 cups + 2 TBSP) all-purpose flour

50 g  (1/3 cup) ground almonds

75 g (1/3 cup) granulated sugar

160g (11 TBSP) salted butter at room temperature, cubed

1 egg yolk

Rub together with your fingertips, the flour sugar and butter until the mixture resembles coarse meal. Add the egg yolk and work through together with your hands. Turn out on to a floured surface and work it together into a smooth ball. Wrap in plastic wrap and place in the fridge for 30 minutes to rest. When the time has elapsed take the dough out of the fridge and wait for 10 minutes before rolling it out. I roll it between two sheets of parchment paper and then mark a circle around the tin and then use a palette knife to separate the pastry from the parchment, finally using the parchment to flip it into the tin. Line the individual tart shells. You can make the pastry in advance and freeze in the individual tart shells or freeze any extra pastry that you have. If you are working from frozen, take the shells out of the freezer about 1/2 an hour before you want to use them. If you are working from fresh, refrigerate the pastry shells while you make the filing.

Filling

56 g  (1/4 cup) butter

70 g (1/2 cup) powdered sugar

85 g ( 3/4 cup) almond flour/meal

1 TBSP all-purpose flour

1 egg

50 g chocolate (70% cocoa)

2 small Bosc pears

25 g  (1/8 cup) granulated sugar

1/2 tsp cinnamon

Slice the pears in half lengthwise and remove the core from each half with a melon-baller or spoon.  Now slice finely lengthwise, keeping the slices together and place on a plate. Squeeze some lemon juice over the slices to keep from browning while you make the rest of the filling.

Melt the chocolate slowly over a double-boiler while you make the filling (or cheat like I did and do it in the microwave.)

To make the filling, combine the butter and icing sugar until light and fluffy. Beat in the  flour and almond flour followed by the egg and the almond extract.

Divide the filling between the tart shells and spread evenly into each. Divide the chocolate between the shells, dropping it in spoonfulls over the filling. Run a knife through the chocolate to mix it slightly into the filling. Now place your pears, keeping the fine slices together in the centre of the tart shell and press down slightly so that the filling squeezes up around the sides and the slices separate ever so slightly. Combine the granulated sugar and cinammon and sprinkle over the pears.

Bake in a 325 oven for 50 minutes or until the pastry is nicely browned and the almond filling springs back when touched.

Now taste it. You're welcome!

Pimientos de Padrón

Os pementos de Padrón, uns pican e outros non - Galician Saying Translation: Some are hot. Some are not.

I love these. Perhaps I'm biased. They are pretty much considered the national dish from the land of my birth. That's Galicia - in the northwest of Spain. Notice the quote? Not quite Spanish is it? Yep, that's Galego. Named for the town of Padrón, most of these tiny peppers are sweet and mild. The odd one is not. It's  hot. Very hot. There may be tears. Consider yourselves warned.

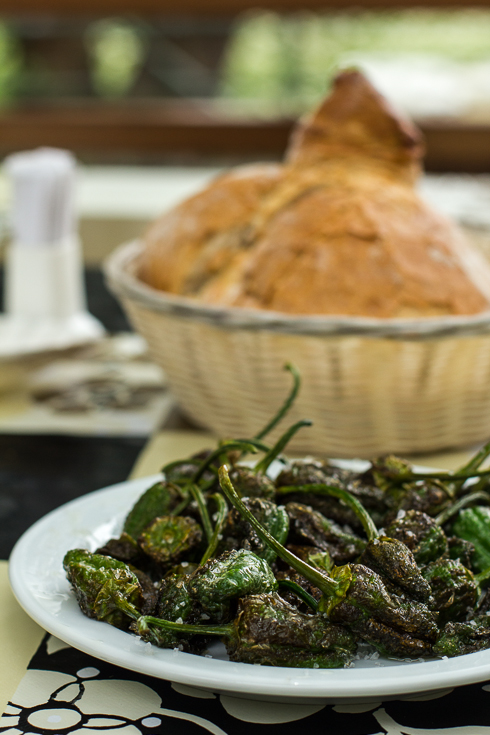
On a recent trip to Galicia, I ate these little beauties almost every day. Next to jamón, they are probably my favourite local thing. At a bar in the spa town of Caldas de Reis, after arriving a little too late for lunch we were offered a lovely plate of these and a massive mountain of bread. A satisfying meal with an element of gambling thrown in. What is not to love? At the time it was early spring, when typically the peppers contain less of the spicy compound capsaicin,  and we were hard pressed to find a hot one among the batch we ate. Even though we had no "winners", they were delicious nonetheless.

Pimientos del Padrón y Pan ©2013 Helena McMurdo.jpg

Up until recently, it was hard to find these outside of Spain. Lately I've seen them regularly in blog posts from New York and yearn for them wistfully. I  chanced upon some in Portland, Oregon a couple of years ago at Toro Bravo.  I saw them in Seattle for sale. But I had never seen them in Vancouver.

So imagine my delight when I stumbled across them at the Trout Lake Farmer's market. The lovely people from Klippers Organics of Cawston BC had a load of them. And I am told, they are the only ones growing them in Canada.  Fill me up. I was a pretty happy girl leaving the market with my peppers in tow.

Pimientos de Padrón ©2013 Helena McMurdo.jpg

Fry them quickly in olive oil, toss them with some sea salt. Nothing more is required.

Fried Pimientos de Padrón ©2013 Helena McMurdo.jpg
Pimientos de Padrón with Maldon ©2013 Helena McMurdo.jpg

It's September or maybe it's the way they are grown here but I found the majority of these were hot and yes there were some tense moments. But they were good. So good. When can I get more?


Want to receive posts like this, right to your inbox? Just enter your email address below and it shall be done.

Client Work: Cloud 9 Specialty Bakery

I was very fortunate to have an opportunity to work with B3 Communications recently and to style and shoot some work for Cloud 9 Specialty Bakery. They are such fun to work with and we had a great collaboration. Cloud 9 Specialty Bakery is a local bakery specializing in gluten-free products. They have developed a special gluten-free baking mix which takes the hassle of making gluten-free treats at home. Used just like flour, it can be substituted cup for cup in any of your favourite recipes with really great results.

We wanted to capture the beauty and simplicity of the ingredient, so we selected a very simple tone-on-tone colour palette that reflected the contemporary sophistication of the brand while acknowledging it's traditional roots.

Here are my favourite images from the shoot of Cloud 9 Baking Mix and Cloud 9 Gluten-Free Bread.

Cloud9 SpecialtyBakery_©2013 Helena McMurdo.jpg

If you are interested in gluten-free baking please check out Cloud 9 Specialty Bakery.

If you are interested in my food styling and photographic work and would like to know more about working with me, please don't hesitate to get in touch at helena@myendlesspicnic.com